A mega-compilation of resources I've collected over the years to help me improve at Super Smash Bros. Ultimate. Although many of these resources are specifically geared towards SSBU, they may be applicable to other fighting games as well. I've tried to only include resources that I've personally watched or read and found to be useful. I am constantly updating this document, so please reach out to me on Discord if there's anything you think I should add or change!
General Resources
Smash 101
Beginners Guides
- The Ultimate New to Smash Guide
- /r/CrazyHand's Beginners Smash Guide
- Art of Smash Ultimate
- Jay Rego's Newcomers Playlist
- Beginners Guide [1]
- Beginners Guide [2]
- The Fighting Game Glossary
Modding
- The Ultimate Noob Guide for Hacking Your Nintendo Switch
- Is My Switch Patched?
- Switch Modding Guide
- Smash Ultimate Mods - GameBanana
- jugeeya's Training Modpack
- Legal Stages Mod
- Less Delay Mod
Character Data
- Ultimate Frame Data
- Understanding Frame Data
- Frame Data: Everything You Need To Know
- Frame Data and Shields Presentation
- Out of Shield Punishes
- Kurogane Hammer
- Ruben's Smash Ultimate Data Viewer
- Smash Ultimate Hitbox Viewer
- Rekzius's Hitbox Analysis Playlist
- riSygneD's Advantage Calculator
- Charts of All Characters' Airdodge Distances, Rolls, Tech Rolls, and Ledge Rolls
- Ledge Hang Tier List
- A Video Showcasing Every Character's 2-Frame Vulnerability
- A Reddit Thread of All Attacks That Hit Below Ledge
- Character Weight
- Grabs and Grab Range
Game Mechanics
- Super Smash Bros. Ultimate Stage Comparison Tool
- Priority, Spacing, Clanging, and Rebound
- Hold Buffering
- Invincibility, Intangibility, and Armor
- Damage Based Armor, Knockback Based Armor, and Super Armor
- Multipliers
- What Exactly Does "Stick Sensitivity" Do in Smash Ultimate?
- How the Control Stick Works
- How the C-Stick Works
- Paralysis Time Formula for Ultimate
- Details regarding meteor smashes KO'ing before reaching the bottom blast zone
- Meaties: Any move with more than one active frame can have variable on-shield / on-hit based on when it connects
- What Does "Extending a Hitbox" Mean?
- Attacks classified as "indirect" actually give a higher advantage on parry
- Crawls skip walk acceleration, so any character with a crawl can use it to shorten their dash
- How Untechables Work (launch speed 6 or higher)
- Everything You Need to Know About the Ledge
- A chart of "dash speed/run speed ratio" for all SSBU characters (characters that benefit most from "foxtrotting")
Made by WhyDo

How Tilt Stick Works. Made by SK, originally from Isabelle Discord
How Frame Advantage Works
**Green** = the defending player's lag/stun
**Red** = the attacking player's lag
- Shield advantage for aerials = shieldstun - landing lag
- For example, you hit your opponent's shield with an aerial. If your opponent can act after 6 frames of shieldstun, and you can act after 9 frames of landing lag, your frame advantage is 6 - 9 = -3
- Technically the formula is (shieldlag + shieldstun) - (shieldlag + frames it takes to land + landing lag). We can ignore shieldlag because these freeze frames are equal on both sides. UFD assumes you land immediately after your aerial connects, but frames it takes to land should be taken into consideration since it's rare to land an aerial immediately after it hits
- Autocancelled aerials. If an aerial is autocancelled, you do not suffer the move's regular landing lag; instead, you land with "hard landing lag" (4 frames for most characters, but 3 for Pichu and 5 or 6 typically for heavy characters) (Note: Autocancelled moves will always incur hard landing lag, even if the move is autocancelled out of a short hop or without fast falling). The formula for autocancelled aerials is shieldstun - (frames between last active frame and start of autocancel + hard landing lag)
- For example, Pikachu's fair's latest active frame is 27, autocancels starting on frame 32, and deals 3 frames of shieldstun. If autocancelled perfectly, your frame advantage is 3 - (4 + 4) = -5
- "Frames between last active frame and start of autocancel" is just another way of saying "frames it takes to land." In the example above, Pikachu's fair hits on frame 27 but he won't land until frame 32 (Pikachu is in the air on frames 28, 29, 30, and 31, a total of 4 frames)
- When UFD says a move can be autocancelled on frame 32, that means you can land and start your first frame of hard landing lag on frame 32 (Pikachu is in landing lag on frames 32, 33, 34, and 35, a total of 4 frames; Pikachu is able to act on frame 36)
- Shield advantage for grounded moves = shieldstun - endlag
- For example, you hit your opponent's shield with a grounded move. If your opponent can act after 9 frames of shieldstun, and you can act after your move connects and ends (endlag = total frames - startup frames; let's say it's 33 - 8), your frame advantage is 9 - (33 - 8) = -16
- Again, technically the formula includes shieldlag on both sides, but we can usually ignore that. Exception for projectiles, because the opponent suffers shieldlag but the projectile-user does not. The formula for projectiles is (shieldstun + shieldlag) - endlag
- UFD assumes you hit with the first active frame possible. This is not always the case. You'll have less endlag and thus more frame advantage if you connect with a later active frame (this is called a meaty). For example, Lucina's FTilt is -15 on shield, but it's active from frames 8-11. It's -15 when you hit on frame 8, but if you hit on frame 11 (3 frames later), it's -15 + 3 = -12
- However, keep in mind some moves get weaker during later hits and thus deal less shieldstun, so you can't always just add frames to the shield safety listed on UFD
- Shieldstun is affected by freshness/staling. A "fresh" move (not one of the last 9 moves you've used) has a freshness bonus and deals 1.05x damage and thus more shieldstun
- When a move is used multiple times, it is assigned a staleness value based on the move's position in the staleness queue (positions 1 through 9 each have their own staleness value; values are added together if the move is in multiple positions)
- A stale move deals (1 - staleness value)x damage. (Note: A position's staleness value is multiplied by 0.85 if the move hits the opponent's shield. The aggregate staleness value is multiplied by 0.3 when calculating knockback.) As a move stales it deals less and less damage and thus less shieldstun, so it becomes less safe. Note that UFD is not consistent with its shield advantage calculation and sometimes assumes a move is fresh and other times does not
- See also dodge staling, which can impact an opponent's ability to escape combos, for example, if their airdodge is staled and comes out slower
If the attacker's move is -9 on shield, the defender can punish with anything frame 9 or faster (because the attacker can't act until frame 10, at which point they could shield)**; but be sure to add shield drop (11), jump squat (3), or shield grab (4) frames to the defender's out of shield (OoS) option, if applicable
- Jump, Up B, and Up Smash out of shield do not incur shield drop frames. So a frame 3 aerial would come out frame 6 OoS because it takes 3 frames to jump and leave the ground
- Parrying avoids the 11 frames of shield drop, so the defending player can act immediately out of a parry. Parrying also adds +3 to the defender's advantage (except "indirect attacks," which can add +9). So if the attacker lands an aerial that is -10 on your shield, that means you are +10 as the defender, and then you can add an additional +3 for the parry, so you are actually +13 (in other words, the attacker cannot act until frame 14)
- Hitstun advantage = hitstun (+ landing lag) - endlag/landing lag
- For example, if a move is +5 on hit, the attacker can act 5 frames before the opponent (the opponent is -5 and cannot act until frame 6, at which point they could shield)
- An opponent in hitstun cannot act, except for directional influence (DI) and teching after they are sent into tumble
- An opponent is sent into tumble after a certain amount of knockback (around 80 units). After hitstun ends, a tumbling character can perform most normal actions again, including aerial attacks, jumping, and special moves (all of which end the tumble state)
- A combo is true when you hit your opponent before they are able to use a fast-enough escape option. A combo is hitstun true when you hit your opponent while they are still in hitstun. For example, if you use a move that is +5 and then follow up with a move that hits your opponent on frame 5, your follow-up is "hitstun true" because your opponent is still in hitstun and cannot act (unless they are sent into tumble, in which case they can DI and tech). However, keep in mind that even if a combo is true you may not be able to reach your opponent in time if your first move sends them too far away or if your move sends them into tumble and they DI out of range
- Advantage on lock, trip, or footstool = opponent's animation length - endlag. Getting locked/tripped/footstooled has a fixed animation length for all characters, therefore advantage is solely affected by your move's endlag, not its hitstun. A move with a faster first actionable frame (FAF; endlag + 1) will have more advantage than a slower move. The endlag for footstooling also has a fixed animation length, so advantage on footstool is always +21. Again, keep in mind that you may need to factor in frames needed to reach where the opponent is
- An opponent's landing lag may increase your hitstun advantage if they have to land during or immediately after hitstun (this is assuming they are not sent into tumble, in which case they'd be put into a tech situation instead of landing)
- For example, if your opponent is in 3 frames of hitstun and lands on frame 4 with 2 frames of landing lag, they are inactionable for an additional 2 frames, thereby increasing your hitstun advantage by 2
F1 F2 F3 F4 F5 HS HS HS LL LL Keep in mind that an opponent's landing lag may *overlap* with their hitstun. For example, if your opponent is in 3 frames of hitstun and lands on frame 3, one frame of landing lag is shared with hitstun and they are inactionable for an additional 1 frame, thereby increasing your hitstun advantage by 1.
An opponent can SDI down to land earlier and intentionally overlap their landing lag with hitstun to avoid increasing your advantage by more than 1 (the game will seemingly always add 1 frame of advantage, even if landing lag and hitstun completely overlap).
F1 F2 F3 F4 F5 HS HS HS - LL LL - - Hitstun should not be confused with hitlag, which are just freeze frames where both the attacker and opponent are frozen in place (see also shieldlag). An opponent is able to use smash directional influence (SDI) during hitlag to adjust their position and escape combos or multihit moves
- The formula for hitstun in Ultimate is 0.4 * knockback - 1, but it is also affected by a new "speed-up effect" that takes place when a move sends the opponent into tumble. Once a move starts sending into tumble, hitstun frames increase more slowly than in previous Smash games. Manual hitstun modifiers can add to or deduct from hitstun frames
- The formula for shieldstun in Ultimate is d * 0.8 * t * m + 2, rounded down
- d = damage the move would have done if not shielded
- t = 0.725 for smash attacks, 0.33 for aerial attacks (excluding grab aerials and landing hitboxes), and 0.29 for indirect attacks (such as projectiles)
- m = a manual shieldstun multiplier that is specified for each hitbox
- Knockback is a complex formula that is predominantly based on the amount of damage dealt (but using 0.3x the freshness/staleness value) and the opponent's percentage after damage is added, but also factors in a move's base knockback (BKB; distance traveled at 0%), knockback scaling/growth (KBG; how much knockback increases as percent increases), the opponent's weight, and other variables such as rage. Knockback can also be reduced if the opponent has armor (knockback resistance)
- If a move has fixed knockback (FKB), then d is set to that value, and p is always 10. As a result, knockback with FKB is independent of damage dealt (and ignores the freshness/staleness modification) and the opponent's percentage, but is still dependent on the other factors
- The 1v1 multiplier deals 1.2x damage in a match between two players with items off, however it is applied after knockback and does not affect hitlag, hitstun, or shieldstun
shieldstun = d * 0.8 * t * m + 2
Fundamentals
Movement & Positioning
- Art of Smash Ultimate - Training Exercises
- Smash Ultimate Movement Guide Part 1 - General Movement Drills
- Smash Ultimate Movement Guide Part 2 - Aerial Movement Drills
- Smash Ultimate Movement Guide Part 3 - Special Movement Drills
- Smash Ultimate Movement Guide Part 4 - Platform Movement Drills
- Stage Control Guide
- Stage Control and Key Positioning
- Coaches Corner Podcast Episode on Stage Control
- "Reposition and React" (overcommitting and guessing vs reacting, positioning yourself in a "reactive stance," anticipation vs reaction, watching your opponent's character model)
- IzAw's Guide to Movement and Positioning
- MoS | Trixx Explains Burst Range and Positioning
- How to Leverage Burst Range
- How to Approach With Non-Linear Options
- Spacing, Timing, and Avoiding the Corner
- Ramses Explains Movement
- The Tweek
- Micro Dashing
- Tempo Training
- Smash's Forgotten Movement Tech (doing nothing)
- Dabuz's Training Technique to Improve Movement (unmap shield)
- IzAw's 5 Levels of Approaching
- Level 0 - Not in burst range
- Level 1 - In burst range (Poké Ball distance)
- Level 2 - Safe pressure
- Level 3 - Call-outs (trying to hit the opponent)
- Level 4 - Mixups
Neutral
- The Neutral Triangle
- Machaboo on Fundamentals
- Neutral.mp4
- The 3 Basic Components of Footsies
- The 3 Pillars of the Neutral Game
- How to Play Neutral (goal moves, mixups, and reacting)
- Nuances of Neutral (understanding your opponent's options, range, spacing, and focus)
- Footsies Handbook (Street Fighter, but general concepts are applicable to all fighting games, especially Chapter 1)
- MKLeo's School of Smash on Neutral
- IzAw Discusses Neutral, Burst Range, Spacing, and Adaptation ("auto-spacing" your moves, thinking about what the opponent wants)
- The Importance of Anti-Airs
- Neutral Doesn't Have to be Clean to be Effective
- What NOT to Do in Neutral
- The Mind of Nairo & Light: Aggressive Neutral
- The Mind of Samsora: Bait and Punish
- Bait and Punish Approaches
- Dabuz on How to Land More Grabs
- How to Get Better at Grabbing
- 5 Tips for Better Neutral
- VoiD's Guide on How to Hit Your Opponent
- How to Hit the Opponent More
- Approaching Neutral Using "High, Mid, and Low"
- Cycling Through Neutral Approach Options
- Mixing Up Approach Options With "Flip In, Flip Out"
- 5 Tips to Instantly Improve Your Neutral (including doing nothing)
From Neutral.mp4 by Krackatoa
Made by mellowfermion, @Fermion_Adam
- The Neutral Triangle (space-based)
- Poking
- Putting out a hitbox to cover space
- Poking beats an opponent who is overshooting
- Poking loses to an opponent who is reacting
- Reacting
- Waiting for the opponent to make a move and then reacting
- Reacting beats an opponent who is poking
- Reacting loses to an opponent who is overshooting
- Overshooting
- Hitting where you think the opponent will be
- Overshooting beats an opponent who is reacting
- Overshooting loses to an opponent who is poking
- Poking
- Machaboo's Three-Structure (time-based)
- Preemptively covering space (oki-waza)
- Putting out hitboxes to cover space or beat a certain option
- Establishing offense (ate-waza)
- Doing a move that will hit a waiting opponent
- Passively waiting (sashi-kaeshi)
- Waiting for the opponent to make a move and then reacting
- Preemptively covering space (oki-waza)
- IzAw's 3 Intentions from burst range
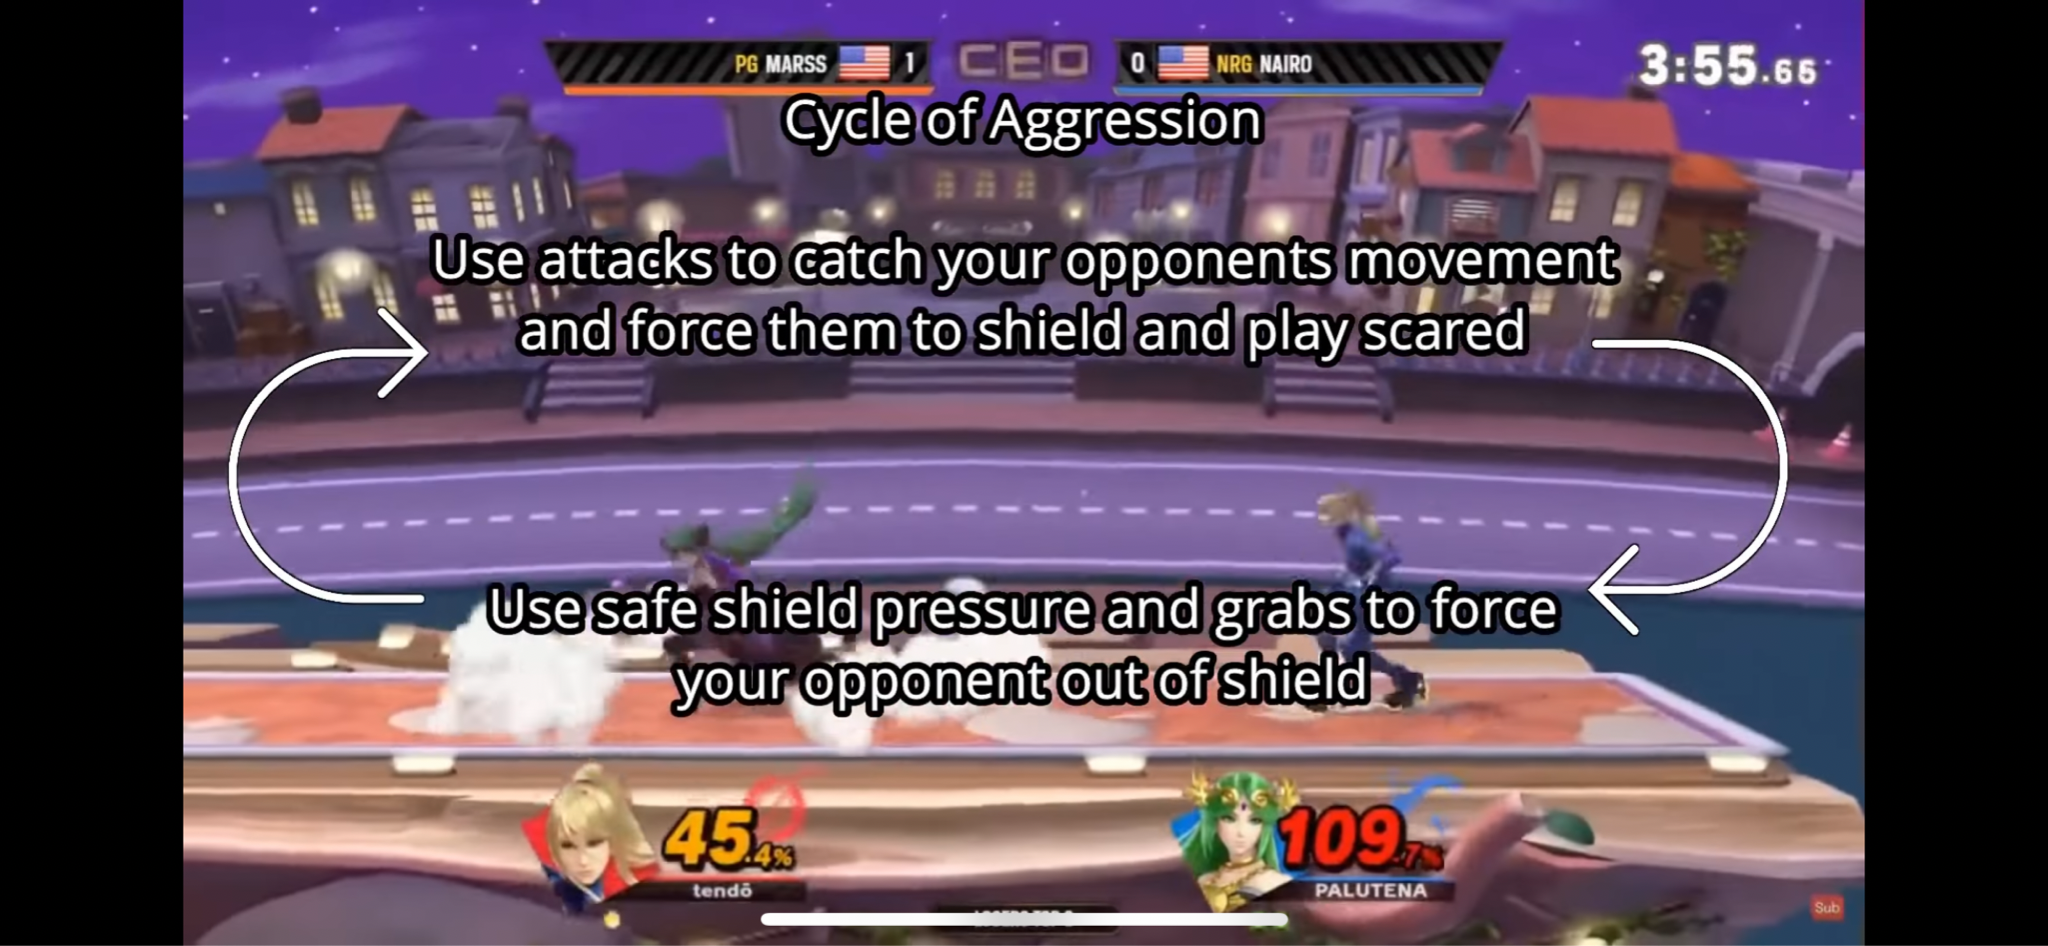
- Safe shield pressure (45%)
- SH, land aerial, dash away. Be ready for opponent to roll, punish OOS, jump, or stay
- If opponent unshields and overshoots, you can land aerial into something else, like a tilt
- Bait and punish (45%)
- Dash away and react, or dash-shield in and react
- Call-outs and burst options (10%)
- Risky
- You can call out a shield, attack, or jump, but that means you'll be wrong roughly 2/3rds of the time, and that's not a consistent way to play
- Safe shield pressure (45%)
- Ramses' 3 Intentions
- Aggression
- Defense
- Waiting
- Ramses' Attack RPS (Attack Yomi) (time-based)
- Intercept → Set-up → Waiting → Intercept
- Intercept:
- Fast but laggy
- Dash attack, rising aerials, Falco SideB
- Set-up:
- Slow but safe
- Landing aerials, Young Link Bomb, Samus CS
- Waiting:
- Playing with time to change the situation
- Shield, FH, dash back, walk
- Intercept:
- Intercept → Set-up → Waiting → Intercept
- 5 Options After Pressuring Opponent's Shield
- Shield
- Attack
- Full hop
- Dash away
- Spotdodge
- (Crouch)
- 4 Options After Opponent Pressures Your Shield
- Challenge with a fast out of shield option
- Call out what the opponent does after hitting your shield
- Disengage (roll, jump, dash away)
- Reverse pressure
- 5 Scenarios to Anti-Air
- Burst range neutral
- After opponent pressures your shield
- After you pressure opponent's shield
- Hanging on ledge
- Off stage when opponent double jumps in
Advantage
- Corner Pressure
- The Mind of MKLeo: Opponent in the Corner
- The Mind of MKLeo: Ledgetrapping
- How to Edgeguard (ft. VoiD, Marss, Tweek & Sonix)
- VoiD's Guide on How to Abuse 2 Frames
- VoiD's Guide on How to Kill Off Stage
- Tech Chasing
- Tech Chase Trapping
- Juggling and Sharking
- Buffer Traps and Tech Option Selects
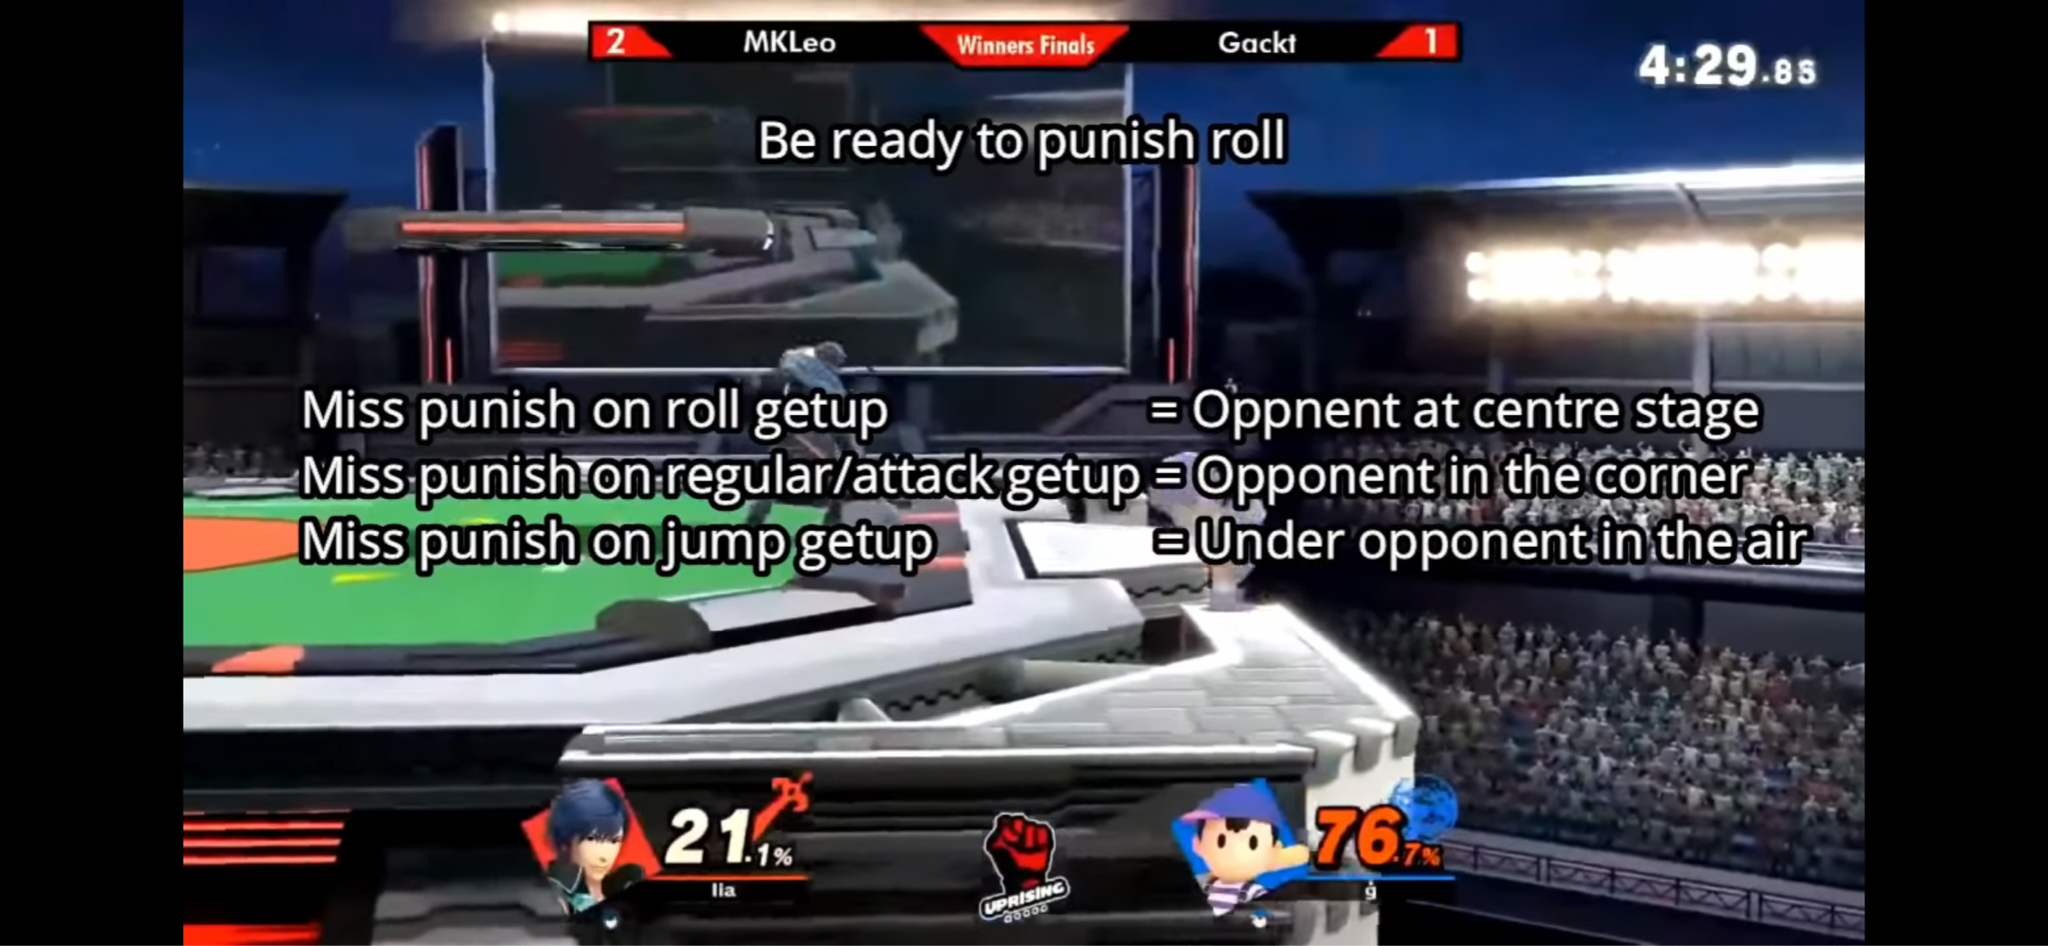
- The Ledge Trump Exploit
- Truly Understanding Ledge Trapping
From The Mind of MKLeo: Ledgetrapping
Disadvantage
- 5 Tips for Disadvantage
- How to Improve Your Disadvantage State
- The Mind of Zackray: Landing from Disadvantage
- The Mind of Samsora and Tweek: Escaping Ledgetraps
- The Mind of Tweek: Escaping the Corner
- ESAM's DI Tips
- VoiD's Guide on DI
- Hold Buffering in Disadvantage
- Buffering Offensive and Defensive Options
- Mixing Up Your DI Last Second (video is about escaping Kazuya combos but can apply to any situation where your opponent is paying attention to your blue DI line)
- How to Stop Missing Your Techs / Air Dodging Offstage with Option Selects
- How to Deal With Rapid Jabs
- Mixing Up Your Recovery to Avoid Getting Edgeguarded Part 1
- Mixing Up Your Recovery to Avoid Getting Edgeguarded Part 2
- How to Mash Out Faster
Game Sense, Adaptation, & Matchups
- IzAw on Reading Habits
- How to Adapt Using Provoking Moves
- Applying Safe Pressure to Learn Defensive Habits
- How to Actively Adapt to Your Opponent Mid Game
- How to Read Your Opponent - Practicalities Podcast
- How to Stop Autopiloting Mid Game
- ESAM Explains Why Autopilot Is Good
- How to Play Around Win Conditions
- Thinking in Sequences
- SmashConceptions: Sequences
- How to Fight Every Character
- MKLeo on Creating a Gameplan
- Ramses on Creating a Gameplan
- Ramses on Playing Reactively and Preemptively
- Why You're Losing to Quickplay Flowcharts
- Approaching a Match (intentions, momentum shifts)
- Understanding Game Phases
- 10 Baits You Can Use Today
- An Anti-Zoning Guide
- How to Approach Campers
- How to Deal with Projectiles [1]
- How to Deal with Projectiles [2]
- How to Deal with Safe Moves
- How to Deal with Mashers
- How to Fight Sword Characters
- Coaching Session with Mew2King
- Overextending and Greed
- Smash Stage - A resource compiling top player opinions on their character's best/worst stages
- Ramses' Gameplan Template
- Per range, I think of my strongest tool
- I think of the general counters to this tool
- → Then we need an answer to these counters
- I think of the general counters to this tool
- Neutral
- Long range [Outside of burst range]
- Mid range [Within burst range but outside of close range]
- Close range [The range in which there are so many options that there is no clear RPS]
- Advantage
- Juggle
- Platform
- Offstage
- Ledgetrap
- Corner
- Disadvantage
- Juggle
- Platform
- Offstage
- Ledgetrap
- Corner
- Per range, I think of my strongest tool
- Questions To Stay Focused
- What do they do after I hit their shield?
- What do they do after they hit my shield?
- How do they like to recover? High, low, mid?
- What's their preferred getup option?
- How do they like to approach? Ground, rising air, landed air?
- How do they edgeguard or ledge trap?
- Do they tech? How?
- How do they get out of disadvantage?
- Do they mash an option to escape combos?
- How do they escape when cornered?
- How do they get off a platform?
- Did they airdodge or lose their jump?
From The Mind of Nairo & Light: Aggressive Neutral
Improvement & Mentality
Practice
- How to Get Better at Fighting Games, by Justin Wong
- VoiD's Smash Ultimate Training Tips
- ADHD's Training Program (heavy emphasis on gaining control of your character)
- Colinies Training Routine
- Albert's Practice Routine
- PPMD's Shadowboxing and Solo Practice Guide
- Cody Schwab's Guide to Improvement
- lloD's Guide to Improvement
- Dabuz on Practicing Efficiently
- How to Improve at Smash Ultimate
- How to Practice in Training Mode
- Practicing with CPUs
- Should You Play Against Level 9 CPUs?
- Practice Tips from Red Gerran (mentions CPUs)
- Practicing on Wi-Fi
- Sonix Explains How to Use Wi-Fi Effectively - Practicalities Podcast
- SmashConceptions: Shadowboxing
- Practice Using "Spaced Repetition Systems" (explanation + spreadsheet template)
- Smash Training - Spaced Repetition Trainer
- How to Make Time for Fighting Games (goal setting)
- 5 Reasons Why You're Trash at Smash (excellent tips for improving)
- How to Improve Your Reaction Time
- Coaches Corner Podcast Episode on Improvement
- "How Do I Get Good At Smash?" (a checklist of skills and questions to ask yourself if you want to improve)
- Tips to Quickly Improve at Smash Ultimate
VOD Review
- 4 Box Method of Self-Analyzing (VOD review)
- How to Analyze Punish Game
- Helpful Advice for Analyzing Replays
- Super Smash Bros. Ultimate VODs
- Smasharchives Super Smash Bros. Ultimate VOD Archives
- PlayAid - Analyze Replays with ChatGPT
Mentality
- Art of Smash Ultimate: Mentality
- How to Fix Your Mentality
- How to Not Worry About GSP
- How to Not Get Mad Playing Smash Ultimate
- Why You're Not Bad
- Why One Bad Tournament Doesn't Mean You're Getting Worse (improvement isn't linear + what are "fundamentals" and how to practice them)
- Why You Do "Better" vs Good Players
- A Measured Response Against Fighting Game Difficulty Misconceptions
- "My Reactions Aren't Good Enough for Fighting Games"
- The Game is Math, It Isn't to Blame if You Refuse to Learn What it is Teaching You
- The Wall of Fear
- The Art of Lame, by Justin Wong
- Losing to Learn
- Getting Better at Fighting Games
- 3 Mentality Shifts You Can Use to Improve
- Improvement Advice From a Pro Player - Part 1 (when did things "click" and what resources do you recommend?)
- Improvement Advice From a Pro Player - Part 2 (getting tilted, VOD review, and managing expectations)
- Mind over Meta Archive (a series of articles from /r/SSBPM)
- MindGames Weldon: YouTube Channel From an Esports Psychologist
- The Will to Keep Winning, by Daigo Umehara (Kindle)
- Playing to Win, by David Sirlin
- The Overwatch Guide That Made Me Better At Fighting Games (And Enjoy Them More)
- Yearning in Smash Bros
Physical Health
- Hurt Less, Play More with Dr. Caitlin McGee (hand and wrist exercises and posture tips)
- Wrist Exercises (infographic)
- 5 Hand/Healthcare Tips for Gaming
Tournaments, Finding Games, & Community Resources
- Do's and Don'ts of Your First Tournament: A Guide for Players New to the Competitive Scene
- Anther's Ladder
- MatchBox
- start.gg
- start.gg Player Database
- PGstats
- In The Loop (BarnardsLoop) - OrionRank, OrionStats TTS, and Character Contribution Data
- Smash Ultimate Majors and Supermajors - Liquipedia
- Smash Calendar - Spreadsheet and Calendar of Smash Tournaments
- Smashcords
- Smashboards
- Metafy 1-on-1 Coaching
- Metafy Classes
Universal Tech
- Reverse Aerial Rush (RAR)
- Instant Reverse Aerial Rush (IRAR) & Attack Cancel
- Attack Cancel
- Pivot Cancel
- Extended Dash Cancel (EDC)
- Juggleboy's Extended Dash Cancel (EDC) Tutorial
- Dash Attack Cancel
- Spot Dodge Cancel
- Autocancel
- Instant Dash Attack (IDA)
- Boost Grab
- Roll Cancel Boost Grab
- Boost Roll
- Dash Cancelled Pivot Grab
- Dash Pivot Grab
- Instant Pivot Grab
- Crouch Ledge Slip
- Turbo Teabag
- C-Stick Flick
- C-Stick Macro Specials
- Instant Double Jump (IDJ)
- Full Momentum Nair
- Dash Shielding
- Dash Pivot Shield
- How to Ledge Trump
- Using Option Select to Avoid Fast Falling When Ledge Trumping
- Shield Tilting and In-Shield SDI
- Landing Pivot
- Dash Walking
- How to Parry / Perfect Shield
- Tips for Parrying More Consistently
- Parry Shifting
- Parry Footstool Comboing (PFC)
- Special Out of Parry Option Select (SOPOS)
- Circle Drop Through Platform
- GimR's Slingshot
- GimR's Techmas - Full Presentation
- B-Turnaround, B-Reverse, and Wavebounce
Character Resources
Mario
Donkey Kong
Link
- Smash Ultimate: Art of Link
- Smash Ultimate: How to Use the Remote Bomb
- Link Bread and Butter Combos
- 5 Tips to Improve Your Link
- How to Bomb Recover
Samus / Dark Samus
Yoshi
- Smash Ultimate: Art of Yoshi
- Yoshi Bread and Butter Combos
- How to Play Against Yoshi
- Yoshi's Backwards Jump Animation Can Jump Over Wolf's Lasers
Kirby
- Smash Ultimate: Art of Kirby Part 1
- Smash Ultimate: Art of Kirby Part 2 (copy abilities)
- Juggleboy's Competitive Kirby Tutorial Part 1
- Juggleboy's Competitive Kirby Tutorial Part 2
- Juggleboy's Updated Kirby Guide for 2020
- Sillody's Kirby Guide
- SK's Combo Showcase of Combos without D-Air
- Kirby Bread and Butter Combos
Fox
- Smash Ultimate: Art of Fox
- Fox Guide
- Fox Bread and Butter Combos
- Fox Combos Spreadsheet
- List of Moves That Hit Below Ledge
Pikachu
Luigi
Ness
Captain Falcon
Jigglypuff
Peach/Daisy
Bowser
Ice Climbers
Sheik
Zelda
Dr. Mario
Pichu
Falco
- Smash Ultimate: Art of Falco
- Smash Ultimate: Falco in 8 minutes
- Falco Bread and Butter Combos
- Falco Guide
Marth
Lucina
Young Link
Ganondorf
Mewtwo
Roy
Chrom
Mr. Game & Watch
Meta Knight
Pit / Dark Pit
Zero Suit Samus
Wario
Snake
- Snake Bread and Butter Combos
- How to Play Against Snake [1]
- How to Play Against Snake [2]
- How to Play Against Snake [3]
Ike
- Smash Ultimate: Art of Ike
- Smash Ultimate: Ike in 8 Minutes
- Ike Bread and Butter Combos
- A Guide to Footstool Aether
Pokémon Trainer
- Smash Ultimate: Art of Pokémon Trainer
- Smash Ultimate: Art of Squirtle
- Smash Ultimate: Art of Ivysaur
- Smash Ultimate: Art of Charizard
- Pokémon Trainer Bread and Butter Combos
Diddy Kong
Lucas
Sonic
King Dedede
Olimar
Lucario
R.O.B.
Toon Link
Wolf
- Smash Ultimate: Art of Wolf
- Wolf Advice from Larry Lurr
- How to Play Wolf in Neutral by Jakal and CDK
- Wolf Bread and Butter Combos
Villager
Mega Man
Wii Fit Trainer
Rosalina And Luma
Little Mac
- Little Mac Beginners Guide
- Little Mac FAQ
- The Mac, and How to Swing It (Advanced Guide)
- Little Mac Bread and Butter Combos
Greninja
Palutena
- Smash Ultimate: Art of Palutena
- Smash Ultimate: Palutena in 8 minutes
- Palutena Bread and Butter Combos
- Short Warping / Teleport Shortening Tutorial
Pac-Man
Robin
Shulk
Bowser Jr.
Duck Hunt
Ryu
Ken
Cloud
Corrin
Bayonetta
Inkling
Ridley
Simon/Richter
King K. Rool
- Smash Ultimate: Art of King K. Rool
- King K. Rool Bread and Butter Combos
- How to Play Against King K. Rool
Isabelle
Incineroar
Mii Brawler
Mii Swordfighter
Mii Gunner
Piranha Plant
Joker
Hero
Banjo And Kazooie
Terry
Byleth
Min Min
Steve
- Smash Ultimate: How to Steve
- Steve Bread and Butter Combos
- How to Play Against Steve [1]
- How to Play Against Steve [2]
Sephiroth
- Smash Ultimate: How to Sephiroth
- Sephiroth Bread and Butter Combos
- How Sephiroth's Wing Deactivation Works
Pyra / Mythra
- Smash Ultimate: How to Pyra & Mythra
- Pyra And Mythra Bread and Butter Combos
- Mythra's Lightning Buster Sets Everyone to the Same Weight
Kazuya
- Smash Ultimate: How to Kazuya
- Kazuya Bread and Butter Combos
- How to DI Kazuya Combos [1]
- How to DI Kazuya Combos [2]
- KazuyaMishima.com
Sora
short bio
Husband, father of 2 kids, occassional gamer. I like tech, home life, and horror movies.
current status
Reading: TRANCE Formation of America: The True Life Story of a CIA Mind Control Slave, by Cathy O’Brien & Mark Phillips
Listening to: X's For Eyes - The Red Jumpsuit Apparatus
Watching: The Beauty
buttons


recent updates
2/27/26 - Added custom fonts.
2/5/26 - Working on adding content like this to the homepage.
webrings
None yet.